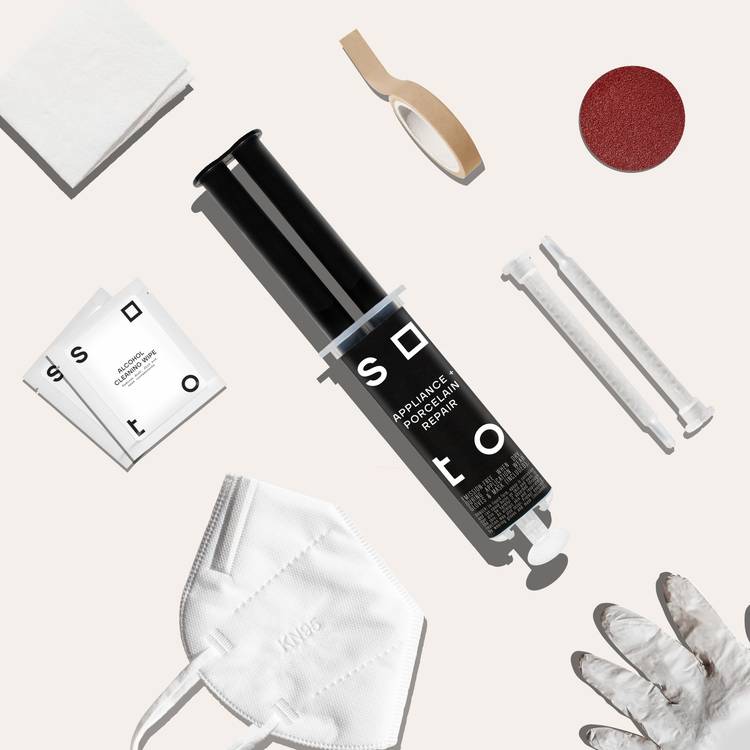
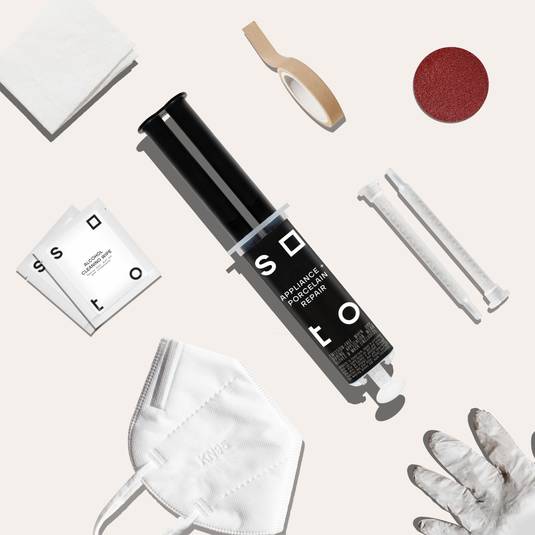
Soto's Appliance + Porcelain Epoxy Repair Kit is your go-to solution for seamlessly fixing chips, cracks, and other damage in your kitchen and bathroom on appliances, porcelain and tile. This all-inclusive kit is specially designed to deliver a durable and long-lasting repair. The user-friendly epoxy formula premixes at the syringe tip to ensure a hassle-free application, while minimizing exposure to the epoxy.
The kit includes everything you need for an easy repair:
- Instant-mix mess-free epoxy
- 2 tips (more available here)
- Masking tape
- Sandpaper (two different grits -- more available here)
- Alcohol cleaning wipes
- Cotton cleaning towel (more available here)
- A pair of disposable gloves
- A mask
- Small mixing cup and stick (if needed)
- Scraper
- Remove any loose porcelain, paint or flakes*. Sand area with included 80-grit sandpaper, then clean area with included alcohol cleaning wipe. *larger pieces can be glued back on, see instructions below.
- Use masking tape to tape around the area needing repair.
- Make sure to wear gloves and a mask to avoid contact with the epoxy. Do not breathe fumes while handling epoxy. Once dry, epoxy is considered inert and does not continue to off-gas or emit harmful emissions.
- Keep an alcohol cleaning wipe on hand to quickly clean up messes while the epoxy is still wet.
- How to use the Appliance + Porcelain Epoxy Filler, 3-ways:
- Horizontal surfaces: Remove cap and attach tip to syringe. Place tip into groove or crack and press plunger to slowly release epoxy into crack.
- Vertical surfaces: Remove cap and attach tip to syringe. Squirt pre-mixed epoxy into enclosed mixing container and allow it to set for up to 1 minute. Keep an eye on it because it hardens quickly! When the epoxy is less runny but still gooey, use enclosed scraper or popsicle stick to transfer epoxy to the defect, ensuring it is filled in completely. Attempt to level it with the surface using the scraper.
- Large piece chipped off: You can glue large pieces back on using the Appliance + Porcelain Epoxy Filler. Remove cap and attach tip to syringe. Then simply apply a small amount of epoxy to the bottom portion of the groove, and reattach the chipped piece. Hold it in until the epoxy begins to harden, about 3-5 minutes.
- When finished with the repair, discard used tip and reattach the cap. Epoxy can be used again using a clean tip (2 are included with your kit, and (more are available here). Allow to dry for 30 minutes to 1 hour.
- Sand dry epoxy with included 80-grit sandpaper until it is level with the surrounding surface, then finish sanding with included 180-grit sandpaper. Wipe off dust using included Disposable Cotton Towel.
- Remove masking tape, slowly. If epoxy is covering the tape, use a straight-edge to gently cut along the inside edge of the masking tape before gently removing.
- Since the epoxy dries clear, you will need to apply Appliance + Porcelain Touch Up (sold separately) over the epoxy to finish the job. Apply the Appliance + Porcelain Paint Touch Up in thick, smooth strokes to minimize brush strokes. Make sure to order a color chart at getsoto.com/colorchart to find your perfect match!